Recipe: Savory Oatmeal Cookies

I know when I read a post on a site that starts with “I’m more of a savory girl than anything else” that I’ve found a soul sister. Or a kitchen sister, at the very least.

That’s how I felt when I stumbled upon these savory oatmeal cookies…how could I resist? A cookie baked deliberately for eating with cheese?! One that builds upon my already well-established love for the more traditional kind of oatmeal cookie (the kind with chocolate chips)? I was so, so sold – even before I saw the cup (yes, cup) of cheese that goes into these stunners. I swear.

Savory Oatmeal Cookies | Arlington Darling

Savory Oatmeal Cookies | Arlington Darling

Let’s just get right to it, shall we? Recipe adapted from The Kitchn.

Recipe: Savory Oatmeal Cookies

Ingredients:
1 cup old-fashioned oats
1/4 cup warm water
1/3 cup olive oil
1/4 cup lightly packed light brown sugar
1 egg
1 cup sifted all purpose flour
1/2 tsp. fine sea salt, plus more for dusting
1/4 tsp. baking soda
2 tsp. chopped rosemary
1/4 tsp. freshly cracked black pepper
1 cup grated parmesan cheese

To Make:
1. Preheat the oven to 350.
2. In a bowl, combine the oats and water.
3. In a separate bowl, combine the olive oil, sugar, and egg. Then, add to the oats.
4. In a separate bowl, combine the rest of the ingredients (flour, sea salt, baking soda, rosemary, pepper, and cheese).
5. Add to the oats bowl and combine.
6. Form tablespoon-sized balls, and flatten gently on a baking sheet, leaving an inch or two of space in between each cookie. Optional: add a sprinkle of sea salt on top of each cookie.
7. Bake for 16-18 minutes or until golden on the edges.

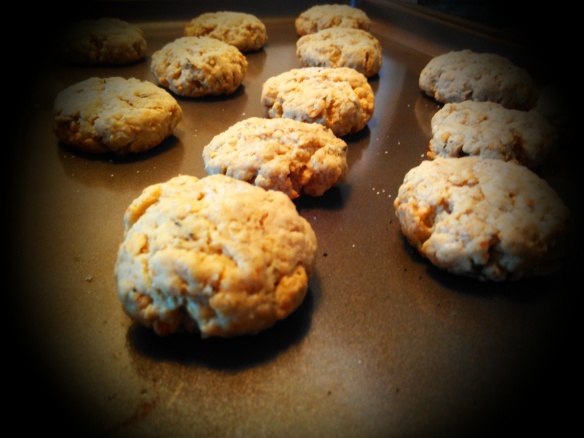
Enjoy! Her suggestion to eat these with a soft, sharp cheese is perfect. I recommend Red Hawk or Humboldt Fog. They’re also good on their own. Just look at the savory texture! Mmmmph!

Savory Oatmeal Cookies | Arlington Darling

Savory Oatmeal Cookies | Arlington Darling

Recipe: Strawberry-Rhubarb-Lemon-Yogurt Muffins

This post is in honor of my dearest E, who is having fabulous adventures on the other side of the world right now! When she lived in DC, she was always conducting baking experiments and I miss eating the delicious results of those experiments. In the case of these muffins, I remember eating them in N’s old car (were we on our way to Old Rag? Or perhaps looking forward to a day of lounging at the pool chez moi?). Regardless, I distinctly remember just being so darn happy to be eating them! They were fluffy and gooey and tart. Mmmm.

E, thank you for introducing me to these delicious strawberry-rhubarb-lemon-yogurt muffins and for your idea to add the lemon and vanilla extract. I can always count on you to add lemon to things, but in this case, it was pure genius!

Arlington Darling | Strawberry Rhubarb Lemon Yogurt Muffins

Ingredients:
2 c. all-purpose flour
1 tsp. baking powder
1 tsp. baking soda
1/2 tsp. salt
1/4 c. butter
1/4 c. vegetable oil
3/4 c. sugar (or sub sugar in the raw)
1 egg
1 c. plain greek yogurt (note: I used 1 container which was 7 oz., and it turned out fine)
1/2 tsp. vanilla extract
3/4 c. chopped rhubarb (1 piece)
1 c. chopped strawberries
1 lemon
1/4 c. brown sugar

To Make:
1. Preheat oven to 450.
2. Cream together the butter, sugar, and oil in a large mixing bowl. This will be your wet ingredients bowl. You can use a hand mixer or kitchen aid if you have one.
3. Combine the flour, baking powder, baking soda, and salt in a separate bowl. This is your dry ingredients bowl.
4. Add the egg, yogurt, and vanilla extract into your wet ingredients. Stir well.
5. Zest the lemon into the wet ingredients bowl. Stir.
5. Add the contents of the dry ingredients bowl into your wet ingredients bowl, adding a little at a time.
6. Once the ingredients are combined, add the chopped strawberries and rhubarb and gently stir (pro tip: toss your fruit with a little flour before adding so that they don’t sink to the bottom of your muffins – I don’t know why this works and never notice a difference if I don’t do it, but supposedly it works).
7. Spray your muffin tin with nonstick cooking spray, grease with a little butter, or use liners. I personally like the crunchy outer layer that you get without liners but it’s your call.
8. Add the muffin mixture to the muffin tins, filling each tin about 3/4 of the way. Add a little brown sugar to the top of each muffin.
9. Bake for 12-14 minutes or until golden.

Adapted from A Spicy Perspective.

Enjoy! 🙂

P.S. E, can’t wait to make these with you again when you’re back stateside! Miss you <3.

Recipe: Extra-Yummy Chocolate Box Cake

As you all know by now, I’m a lady of convenience. Yes, I like fresh food and yes, I try to be healthy, but sometimes there’s nothing better than opening up a box of packaged food, adding one or two ingredients, heating it up, and calling it a day.

Martha Stewart I am not.

So when my cousin asked me to bring a dessert for Christmas dinner, I wanted to make something special for my family, but easy. So! I took a box of chocolate cake mix and jazzed it up a bit (it was for Christmas, after all – can’t just serve regular ol’ boxed cake! I do have some standards).

Extra-Yummy Chocolate Cake | Arlington DarlingIngredients:
1 box of dark chocolate cake mix (like Duncan Hines or Betty Crocker)
Ingredients to make a boxed cake mix (usually 3 eggs, 1/3 cup oil, and 1/4 cup water)
Butter
Milk

To Make:
1. Empty the dry cake mix into a bowl.
2. Add the usual number of eggs.
3. Substitute half of the oil with melted butter (so if the box calls for 1/3 cup of oil, do 1/6 cup of oil and 1/6 cup of melted butter).
4. Substitute milk for water (so if the box calls for 1/4 cup of water, use 1/4 cup of milk instead).
5. Mix together until blended well (use a hand mixer for a fluffier texture).
6. Bake according to box directions.

I think it tasted much richer than boxed cake usually does and it had a nice gooey quality. As you can see from the picture above, I then frosted it using about a can and a half of regular vanilla frosting and added some festive Christmas sprinkles. Whatever floats your boat. I also used a bundt pan which added to the festive-ness.

No one in my family asked if I had made it from scratch, so I guess I wasn’t truly fooling anyone, but… after all was said and done about half of the cake was eaten so I think that’s quite an accomplishment. Definitely making my boxed cakes this way from now on.

Recipe: “White Trash” Christmas Snack Bark

Yeah, you read that right: “White Trash”. It is an unfortunate name for a superbly delicious treat. I guess it got the name from the white chocolate coating and because it is made up of a jumble of things that could look like “trash”? Who knows.

It is my Christmas dessert staple – I make it for coworkers, secret Santa parties, family gatherings, and for myself. Everyone loves it. Now that I think about it, nothing about it (ingredients, colors, name) is very Christmas-y but I guess it’s one of those traditions that just happened. It is so easy to make (takes less than 10 minutes) and all of the ingredients are shelf-stable (you know that’s a requirement for me!) and easily found in most grocery stores.

Arlington Darling | White Trash Christmas Treat Recipe

This year I made some for coworkers and wrapped it up in ziploc bags stapled together with scraps of wrapping paper. Not the most elegant presentation, but it is festive and shows a modicum of effort greater than just throwing a tin into the communal kitchen and emailing out to the office, “share!”

Ingredients:
2.25 cups rice chex
2 cups thin salted pretzels, broken
1 cup pecans, crumbled, toasted
1.5 cups white chocolate chips (or an entire 12oz. bag)
0.5 cups semisweet or dark chocolate chips

To Make:
1. Toast the pecans lightly on a cookie tray in an oven on low heat, being very careful not to burn them.
2. Mix the chex, pretzels, and toasted pecans into a large bowl.
3. Melt the white chocolate chips (using a double boiler or by carefully microwaving in 15-second increments).
4. Quickly stir the melted white chocolate into the chex, pretzels, and pecans. Mix quickly.
5. Once everything is evenly coated, pour the mixture onto a cookie sheet that has been covered with wax paper. Spread it flat as best you can, while making sure that it forms a continuous sheet.
6. Then, melt the semi-sweet chocolate chips and drizzle the melted chocolate over the mixture on the cookie sheet.
7. Let cool for an hour or so in the fridge, and then break into pieces and serve.

Arlington Darling | White Trash Christmas Treat Recipe

Arlington Darling | White Trash Christmas Treat RecipeEnjoy! New name suggestions for this delicious treat are welcome :).

Recipe: Three-Ingredient Cocoa Pumpkin Brownies

Given that I eat a lot of ready-to-eat/raw food like veggies, hummus, avocados, yogurt, and fruit (oh, and cheese), I don’t do a lot of “real” cooking. It’s mostly…assembly. As such, I don’t keep perishables like milk and eggs in the house because I don’t really use them that often. This works out fine except for the times when I want to bake. Oh, baking. When I want to bake, I have to plan ahead and make sure I have milk and eggs in the house.

Sigh.

So when I found a two-ingredient recipe that called for only canned/non-perishable ingredients, I was hooked! That’s the perfect recipe for me – no planning ahead or last-minute grocery store runs! Of course, I modified it to make it my own and added a third ingredient. More chocolate.

Arlington Darling | cocoa pumpkin brownies

Ingredients:
1 box brownie mix (I prefer the dark chocolate/fudge kind)
1 can pure pumpkin (Libby’s or Whole Foods brand)
2 tbsp 100% pure cocoa powder

To Make:
1. Preheat oven to 350 degrees.
2. Mix brownie mix, cocoa powder, and pumpkin in a large mixing bowl (that’s it!).
3. Spray or grease a 9×9 (or equivalent size) glass pan with baking spray.
4. Pour mix into the pan.
5. Bake for 30 minutes.

Note about baking time: I baked my brownies for 30 minutes, and the edge pieces were cooked but the middle pieces still had a batter-like consistency. So I removed the edge pieces and continued to bake the middle pieces on their own in the pan for another 15 minutes. A little ad hoc but it worked :). I need one of these:

The brownies don’t taste exactly like regular brownies – you can definitely tell that they don’t contain any oil, butter, or eggs. But they are ooey-gooey and very chocolatey in flavor (thanks to the cocoa powder), and they hit the spot when you’re in the mood for some last-minute unplanned baking. Enjoy!